My work is supported by affiliate commissions. Learn More
Last Updated January 3 2025

So, you want to build your own website.
Maybe you open your laptop, hit Google, and type “how to make a website.” Five minutes later, you’re drowning in tech jargon—HTML, CSS, domain names, SSL, JavaScript frameworks. WordPress. Wix. It’s overwhelming, right?
But don’t worry, we’re skipping the chaos.
Here’s the truth: anyone can make their own website—even total beginners. And that’s exactly what we’re doing in this article.
We’re taking this simple sketch I drew and turning it into a fully functional website on a real domain name.
We're going to take this sketch and turn it into a website.
We’re covering everything: design, domains, SEO—no shortcuts, no confusion. And the best part? It’s not going to be stressful. It’ll be clear, straightforward, and maybe even fun.
Ready? Let’s do this!
I want to create a website for my YouTube channel, Steve Builds Websites.
If you check out my sketch, it’s a simple, clean design: a logo, a few pages, and a basic homepage.
I made a sketch of what I want for my website.
It’s the kind of website that works perfectly for a small business or personal brand—straightforward, practical, and effective.
Our first task is to choose a tool.
There are hundreds of tools available for building websites, but to keep things simple, we can group them into four categories: frameworks, static site generators, CMS, and website builders:
To be simplistic, we can lump all website tools into four categories.
Almost every website on the internet uses a tool from one of these categories.
If you don’t know how to code, you can skip frameworks and static site generators. Both require coding skills. A CMS like WordPress might involve some coding but usually less, while website builders require no coding at all.
Some tools require coding — other's don't.
On a spectrum of difficulty, frameworks and static site generators are the most challenging, while website builders are the easiest to use:
Frameworks and static site generators are more difficult to use while website builders are easier.
I’ve built websites using tools from all four categories, and here’s what I’ve learned: match the website to the tool.
For example, if you’re building something complex like Facebook, you’d want to use a framework:
Building Facebook? You'd want to use a framework.
But if you’re creating something simpler, like a personal or small business website—which is what we’re doing today—a website builder is the best choice.
Building a small business website? You might want to use a website builder.
You could also use a CMS like WordPress, especially with a plugin like Elementor, but in my experience, it’s not as straightforward. Website builders are simple, easy to manage, and perfect for a project like this.
Okay! So, we're going to use a website builder for our project and guess what? There are plenty of website builders to choose from.
Here are some of the most popular ones:
Some of the most popular website builders.
In my experience, though, a few stand out as significantly better than the rest: Squarespace, Wix, Shopify, Webflow, Framer and Carrd.
These are the 6 best website builders in my opinion.
But here's the thing: remember when I said, "match the tool to the project"? That principle applies to website builders as well because each of these website builders has its own strengths.
So here’s a quick overview of each website builder:
These are the best all-around website builders. They both use drag-and-drop editors, allowing you to easily move elements around your website, resize them, and reposition things exactly how you want.
Squarespace and Wix are versatile tools used for building all kinds of sites, from small business websites to portfolios, blogs, and more. Personally, I prefer Squarespace over Wix, but Wix is still a great option and deserves a mention.
Squarespace and Wix are drag-and-drop editors.
Shopify is hands-down the best option for ecommerce. If you're building a proper online store with multiple products, variations, and a streamlined checkout process, Shopify is your best bet.
It’s not as easy to use as Squarespace or Wix because it’s not a drag-and-drop editor, but its features for ecommerce are outstanding.
Shopify isn't a drag-and-drop editor like Squarespace and Wix but it's excellent for ecommerce.
Carrd is an interesting choice because it’s by far the most affordable option—but there’s a catch. Carrd is specifically designed for one-page websites.
You’ll often see Carrd used for personal websites, landing pages, or simple portfolios. If your website can be condensed into a single page, it’s worth considering.
Carrd is great for landing pages and personal websites.
Webflow and Framer are the best tools for completely custom designs. With these platforms, you can build virtually any design you can imagine, complete with sophisticated animations. For example, I’ve seen people recreate Apple’s website in Webflow—it’s that powerful.
The trade-off? Both Webflow and Framer have a steep learning curve. Even if you have a web design background, expect to spend several days (or even weeks) getting comfortable with them. Framer is a bit easier to learn than Webflow, but both provide unparalleled design freedom.
Editing a website in Webflow.
Now let’s match my project— a website for my YouTube channel — with the right tool.
That leaves Squarespace and Wix. And for this project, I’m going with Squarespace because, as I mentioned, I prefer it over Wix.
That said, you don’t have to use Squarespace. The key takeaway is to match your website project to the right tool.
With that, we’ve completed our first major goal: choosing the right tool. Squarespace is our platform of choice, and now it’s time to get to work. Let’s build our website!
Note: Many links in this article are affiliate links. Clicking them helps support my work, but rest assured, this is not a sponsored article. I currently have websites on Squarespace, Shopify, Webflow, and Carrd, and I trust these tools for my own projects.
The first step is to sign up for Squarespace.
Once you're in, you’ll have the option to create a website using a template or from scratch with a 'Blank Template'.
Squarespace offers a wide range of templates to get you started, many of which are stunning and professionally designed.
However, for this tutorial, we’re going to build a site from scratch using a 'Blank Template'. Don’t worry—it’s more straightforward than it sounds!
To get started, click “Create Website” and choose “Blank Template”:
Click 'Create Website' and select 'Blank Template'
This will take you directly into the website editor:
Squarespace website editor
Start by clicking Pages in the menu. I'll add five blank pages.
Once added, you’ll see these pages listed in the site’s navigation:
Once you add the paegs, you'll see them listed in the site's navigation.
Next, we’ll customize the site header. Click Edit...
Click 'Edit'
then choose Edit Site Header.
Click 'Edit Site Header'
To add a button, click on Add Elements. Squarespace offers several options, but we’ll keep it simple and add a button to our header.
We've added a button to our header.
Once the button is added, let’s adjust its layout. Click on Edit Design, and choose the layout that works best for your website. After a few tweaks, we now have a clean, functional header with a button that stands out.
We've selected a new layout for the header — notice how the navigation is now in the center.
Let's take a moment to discuss what makes a good website header.
You might have noticed that website headers tend to follow a consistent structure across the internet. Whether it’s Apple, Charity Water, or the cafe down the street, the layout is often the same:
This consistency isn’t random—it’s deliberate. A familiar header layout ensures visitors intuitively know how to navigate your site, even if it’s their first time. Think of it like elevator buttons: they’re always in the same place, so you don’t have to hunt for them. The same principle applies to your website header.
Most website headers on the internet follow a similar pattern — this creates familiarity.
Let’s talk about the button that often appear in a website header. This button is referred to as a Call-to-Action (CTA), and it’s one of the most important elements of your website.
Your CTA should serve your website’s primary goal. Here are a few examples:
For a salon: “Book an Appointment”
For a landscaper: “Get a Quote”
For a restaurant: “Make a Reservation”
Your CTA should clearly communicate the most important action you want visitors to take.
For my site, Steve Builds Websites, I thought hard about the purpose of my button. With Squarespace, there are plenty of options:
While these are great ideas, they don’t align with my current focus. Plus, scheduling calls sounds like a lot of work, and I feel the world already has enough online courses.
Instead, I decided to keep it simple. My primary goal for Steve Builds Websites is to drive people to my YouTube channel. So my button will say: “Watch on YouTube.”
I decided my CTA button should say "Watch on YouTube"
With our pages added and the header designed, let’s preview the site so far.
We’ve laid a strong foundation:
Things do look pretty basic right now — and we will style this more but first let's create our homepage.
From here, we can continue building and refining the site, step by step. Next we'll create our homepage!
Before diving into creating our homepage, let’s look at a few examples of great homepages to spark some inspiration.
What I Like:
What I Like:
What I Like:
From these examples, a few themes stand out:
Theories are easy to talk about but harder to implement. Now, let’s build my homepage using these principles!
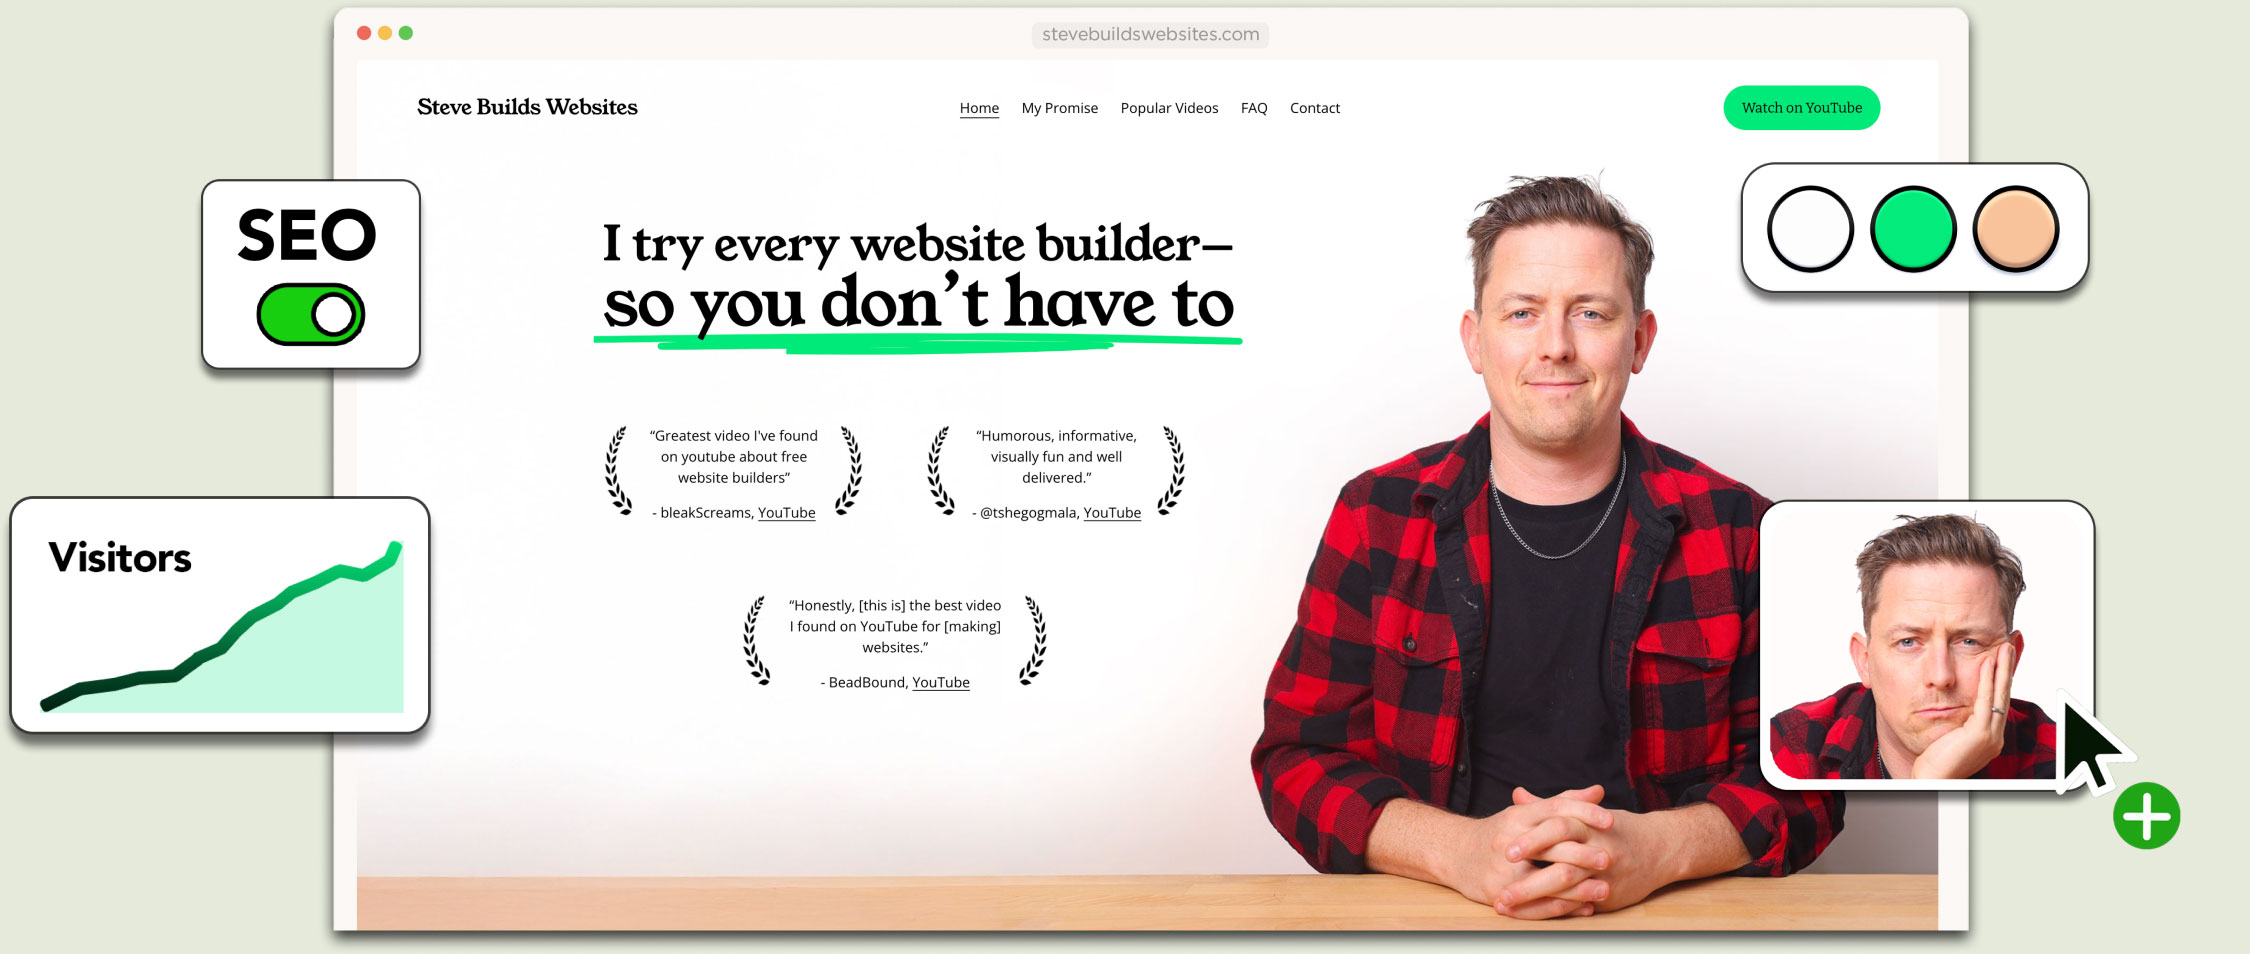
To start, we’ll give this section a background image. Like the examples we reviewed, I want to be human and relatable. So, I’ll place a photo of myself front and center.
I've added a background image to the homepage.
Next, we’ll add a text block for a headline. My slogan will be:
I try every website builder so you don’t have to.
We’ll make it a heading and use Squarespace’s Scale Text feature to ensure it perfectly fits the space.
Our headline uses Squarespace's 'Scale Text' option
A homepage can benefit from an element that builds trust, so let’s add testimonials.
I’ve got tons of YouTube comments that are essentially testimonials, so I’ll use those. For the design, I’ll borrow the fern motif we saw on Apristin Clean’s homepage—it’s subtle and adds a nice touch.
The testimonials themselves are simple: just two images and some accompanying text. Nothing overly fancy, but it gets the job done.
I made these 'testimonials' with two fern images and a text block.
I built that homepage really quickly. It seemed pretty easy, didn’t it?
Well here’s the truth: it took me 10 attempts to settle on this homepage design!
An early attempt at the homepage — I didn't like this one!
Web design isn’t about getting it perfect on the first try. It’s a process of trying different approaches, refining your ideas, and seeing what works.
One major breakthrough for me was realizing my photos weren’t working. Initially, I used photos from my YouTube thumbnails, but they didn’t feel right. Eventually, I decided to take a fresh photo specifically for the website.
Yes, I did a mini photoshoot in my basement, and it made a huge difference!
I needed better photos so I did a photoshoot in my basement.
If you don’t have cameras or lighting equipment, don’t worry. Here are some alternatives:
With the new photo in place, everything else came together seamlessly. I’m happy to say that our homepage is now complete, and I can declare it done with a clear conscience.
Let’s move on to the next step!
Our homepage is ready — on to our next step!
Next, let’s style our website by choosing fresh colors and fonts.
But before we jump in, let’s talk about malls for a moment.
Think about a shopping mall. Most of the stores have the same basic shape—long rectangles.
What makes each store stand out is its entrance:
A typical store entrance in a mall.
There’s a reason Apple stores are tidy and minimalist…
A typical Apple store front in a mall.
…while Toys “R” Us is loud and colorful.
A typical Toys R Us in a mall.
The entrance reflects the store’s personality and appeals to the target audience.
Websites, like stores, communicate a vibe and tone through colors, fonts, and photography.
Building an art portfolio? You might aim for a minimalist style with lots of white space and room for large photos.
Art portfolios might want a minimal color style.
Building a food website? You might opt for something colorful, bright, and playful, perhaps using bold fonts.
Food websites often have a bright, bold style.
For my website, I want a playful vibe. Something that feels approachable and fun.
Fortunately, Squarespace makes this easy. If you open Site Styles, you’ll find several Themes to choose from, including a playful one that I really like:
I choose this 'Playful' theme.
I like this theme, but I want to tweak it to make it my own.
Squarespace palettes typically include:
Here’s what I’m going for:
Here's the color palette I set for my website.
Now, let’s apply these colors to the homepage:
Added a few splashes of color to the homepage.
Nice! The website is already starting to feel more playful and fun.
Now let's build the rest of the website pages.
Sometimes, it’s hard to figure out what pages your website needs. The key is to be thoughtful—create pages that genuinely help your audience.
For example, my mom is a therapist, and her website includes a page called “What You Can Expect,” where she explains what a typical therapy session is like.
This is a great page for a therapist to have — it eases peoples concerns.
I love this idea. For someone who’s never been to therapy, it can feel intimidating. This page helps ease their concerns and prepares them for the experience.
My mom is doing something important: she’s putting herself in her clients’ shoes. She’s answering their questions and addressing their concerns before they even step into her office.
On my website, the first page I want to create is called “My Promise.”
Next we're going to build the 'My Promise' page.
Why?
I’m a YouTuber who reviews tools for building websites, and I imagine one question my audience might have is: “Can I trust this guy?”
This page is where I’ll make specific promises about what viewers can expect from my videos.
Here’s how I’m designing it:
To give the page more structure:
Adding a list of promises to the page.
Good writing is all about being specific. Let me illustrate this with an example of what not to do.
My bank, TD Canada Trust, has a slogan: “Banking can be this comfortable,” often paired with an image of a chair that doesn’t even look that comfortable.
“Banking can be this comfortable”
Here’s the problem: In Canada, banks are notoriously unpleasant to deal with. TD is making a vague promise but offers no concrete commitments to back it up.
Now imagine if their ad said something like: “No hold times longer than 10 minutes.” Boom! That’s a specific promise. That would catch my attention.
Now you have my attention!
When creating your own pages, avoid vague statements like:
These phrases are overused and meaningless. Instead, get specific—make promises your audience can believe.
Below the promises, I’ll include a bit of biographical information. It feels important to share a little about myself somewhere on the site.
I’ll add a photo too, and use Squarespace’s shape tool to make it visually interesting.
I've added some biographical info to the 'My Promise' page.
I’ll be honest: I find copywriting challenging. But my best advice is to write like you’re chatting with a friend over coffee.
Avoid being overly formal—good writing feels natural and conversational.
And don’t forget, tools like ChatGPT or Squarespace’s built-in AI can be super helpful for brainstorming ideas or getting started.
The page still feels a little bland, so here’s my idea: I’ll add animated art to the background using Squarespace’s tools.
Sure, this might sacrifice some readability—the text can become harder to read—but I think it’s a tradeoff worth making because it adds personality and visual interest.
Ultimately, it’s your call for your website. For me, the animated background just makes the page pop.
I think this background adds some personality.
We still have three more pages to build, so let’s go through them quickly:
Popular Videos: This page is a simple gallery showcasing my most popular videos.
The 'Popular Videos' page
FAQ: Here, I’ve answered the most common questions my audience asks. It’s a helpful resource to save everyone time.
The 'FAQ' page
Contact: A straightforward contact page with a form for visitors to get in touch.
The 'Contact' page
And just like that, the entire website is complete!
Now, we’re missing something SUPER important: mobile optimization.
Sure, the site looks great on desktop, but how does it perform on phones?
Well Squarespace has a mobile editor where we can preview. And it looks good on mobile!
Previewing our website on mobile
The next step is to publish our site on a custom domain name.
After that, we can dive into SEO and marketing—because even the best website won’t help if no one visits it!
Domain names might sound intimidating, but Squarespace makes the process incredibly easy.
One important thing to know: if you register your domain with Squarespace, you can always transfer it to a different provider later. No website builder can "hold your domain hostage"—that’s not legal!
Here’s how to set it up:
Keep in mind, domain names do cost money, but it’s worth it to have a professional web address.
Fortunately my preferred domain name was available
To finalize everything, we’ll need to upgrade to a Squarespace paid plan. I’ll select the plan that works best for me, and that’s it—we’re done!
Choosing a paid plan
Our website is live on its very own domain!
You can visit it right now at SteveBuildsWebsites.com. Seriously, it’s there—go check it out!
We did it! 🎉
Our website is live!!
Now comes the fun part—SEO and marketing!
Because no matter how great your website is, it’s useless if no one visits it.
SEO, or Search Engine Optimization, is a term that gets thrown around a lot. At its core, it means optimizing your website to show up in search engine results.
Let’s break it down with an example.
Imagine you run Common Goods Pottery, a real business in Toronto that sells ceramics and offers pottery classes.
Let's brainstorm some SEO strategies for 'Common Goods Pottery'
To get started with SEO, you’d think about the keywords you want to target.
A keyword is simply any word or phrase that people type into a search engine.
For example, potential customers might search for: “pottery classes in Toronto.”
Wouldn’t it be helpful to know how often people are searching for that? Good news—you can!
There are tools that provide keyword volume, which is an estimate of how many people search for a particular keyword each month.
I use a tool called SEMRush to check keyword volume. Let’s test it out:
Let’s brainstorm a bit more:
But here’s the catch: if you check Google, you’ll notice a lot of big competitors like Amazon and Pottery Barn targeting “ceramic mug.” That makes it very competitive.
SEMRush
To avoid high competition, you can add modifiers to your keywords:
Or, take a different angle entirely:
At its heart, SEO is about finding keywords with good search volume that aren’t overly competitive.
If you’re curious about SEMRush, I think it’s a fantastic tool but can be pricey (starting at $140/month). If that’s out of budget, there are more affordable options if you do some research.
Now that we have our keywords, how do we rank for them?
This is where SEO gets more complex. Many factors affect your ranking—far more than we can cover in this video. But here’s a quick overview:
Google Ads can be incredibly effective for small businesses. I’ve used it to help my brother’s concrete company and my mom’s therapy practice, and both saw great results.
A sample Google Ad for 'Common Goods Pottery'
I want to leave you with this: a great website isn’t about technology.
It’s not about mastering HTML or CSS. It’s not about choosing the “perfect” platform—whether it’s WordPress, Squarespace, or Wix.
A great website is about being human. It’s about putting yourself out there and connecting with your audience.
Use colors, fonts, and design elements to create a vibe that resonates, just like the best stores in a mall do with their entrances.
You don’t have to be a perfectionist—just keep iterating until your website feels right to you.
Write conversationally, like you’re talking to a friend. Drop the corporate jargon and make your content approachable.
Be concise. Avoid walls of text. People don’t read the web—they scan it.
And most importantly, don’t make your website all about you. Step into your visitors’ shoes. Understand their needs, their questions, and their goals—and provide solutions.
Even if you don’t consider yourself a “technical” person, don’t worry. That’s not the most important part.
Follow these principles, and you can create a website that truly stands out.
Thanks for reading, and good luck with your website journey!